Slow cookers allow you to transform large, inexpensive pieces of meat into amazing, succulent morsels cooked in vegetable broth. It's also great for a "one pot" meal, though I choose to use a secondary saucepan for the gravy. I love this for wintertime, obviously, but really anytime I want a meal that can be prepared in advance and which I don't have to babysit, this is the way to go. I like pork roasts, particularly in the summertime, for bbq-style pulled pork. I like beef roasts for, well.. a pot roast.
Here is my method:
I look for a roast which is at least 3lbs, ideally bone-in, and with some visible fat marbling. This time I used a chuck roast, hence all the fat.
 |
| Candy cane is optional |
 |
| Tomato paste is often lauded for its ring cleaning capabilities. And If you were wondering, I took this picture with my eyes.* *Lies all around. Forgot to remove my rings until it was too late; we took the picture "Demi Moore in Ghost at the pottery-wheel" style. Minus the sexy. |
Then I add the meat and, if it feels right, I will add a little more balsamic vinegar to the top of the roast, maybe a splash of soy sauce, maybe a splash of Worcestershire. MAYBE even a sprinkle of sugar. I tried to get a photo of this step but it didn't work so well. Here's a cat picture instead:
 |
| Who's a good boy? |
 |
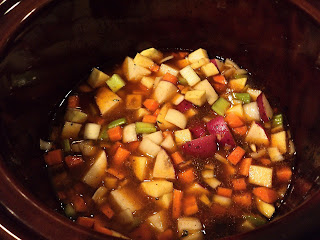
| I like to err on the side of too many vegetables, but I only used three of those potatoes. |
ANYWAY.
The turnip, I should also say, was awesome. It tasted great raw (like a cross between a potato and a carrot... very crunchy, a little sweet) and it cooked in with the other vegetables wonderfully. It kept more texture than I was expecting, meaning it was still "al dente" when the other vegetables were soft, but I thought that was a welcome variant since pot roasts are so soft in general.
 |
| Great knife work, Lenore! |
After several hours, when the roast was cooked through, I took it out and set it aside.
Then I added the vegetables to the pot to cook for an hour or two. ...Definitely closer to two.
 |
| Not pictured: A can of diced tomatoes, drained. |
Once the vegetables seemed well on their way, I added the roast back in the pot and let everyone hang out for another hour or so. Then, when the vegetables are all soft, the meat is tender, and we just can't stand to wait any longer, it's time to make the gravy. This step is entirely optional, but it has two main benefits:
- Removing the liquid from the pot makes it easier to skim off the fat, and
- The broth itself is pretty delicious, but thickening it with flour will help it coat the meat and vegetables.
The broth may also need some flavor attention. Optional additions:
- salt/pepper/cayenne/hot sauce
- splash balsamic vinegar (acid will "wake things up")
- tomatoes/tom. paste
- butter
- red wine
I turn off the heat, take out the meat, and ladle as much of the liquid as I can into a large liquid measuring cup. Let the fat rise to the top and skim off as much as possible. If you have time to spare, it's easier to remove the fat if it's cool. So.. throw it in the fridge? Once the cooking liquid is as "fat free" as possible, pour it into a saucepan. Then I boil it like crazy so it can condense... I'll let it go until it's at least 25% reduced, maybe as much as 50% depending on my hunger level. There was a lot of water in those vegetables, after all. While that's happening, I cut up the meat into chunks, remove as much of the remaining fat/bone/etc. as I can, and then I move the meat and vegetables to a large casserole dish.
Back to the gravy: spoon maybe 2/3 cup of the condensed liquid into a small bowl, add a few tablespoons of flour, and mix until it's smooth. Add more flour or liquid as needed to create a nice, silky mixture. Then I put the flour/broth mixture back into the main saucepan and let it cook until it is thick and lovely.
Once it's all silky and thick, like this
Spoon it over the finished product before serving, and set aside extra gravy for optional additional adornment. Sprinkle parsley if you're going to take a photo.
Add some crusty bread, and you're good to go. This dish lasted five meals. (Between the two of us.)


That crock pot has been well seasoned! Glad to see that it is still
ReplyDeletegetting some good use....and I mean GOOD use. Makes my mouth
water.
d.o.d.
Really learning some stuff here--the turnip, the balsamic vinegar, and....why is "bone-in" preferable?
ReplyDeleteBoyCat looked adorable, by the way.
mom
There's a lot of good flavor in the bones. If something is going to be cooked for a long time, you'll get the most depth of flavor if there are bones involved. Whenever chefs make beef/chicken stock from scratch, they start with roasting bare bones and then cook them with vegetables and water and stuff. Also, for soups, the marrow will make the broth more "velvety."
DeleteThis is awesome! I still haven't used my slow cooker because I don't know quite what to make. (Part indecision, part intimidation.) This is definitely going on my list now!
ReplyDelete