Hello Old Friends!


 |
| second attempt; equally labor-intensive |

Buuut naturally I tried turtles again to accompany the crackers, used different recipe, and it wasn't great:


 |
| Fact: if you make caramel this thick, your father WILL lose a filling |

 |
| Beautiful tooth-killers |
And Thanksgiving too!


Aren't you tired just seeing all that? I work full-time now, people! On my feet!
But excuses excuses, family visits and holidays, and I just get out of the habit of posting blogs.


Beautiful, icy Victoria


Gingerbread contest


But, you know what? It's time to break that ice. Slow the roll. Resume the good habits. When my parents visited six weeks ago, in early December, we reserved a day to make potica. Like old times.
What's that, you say? Potica is an Eastern European pastry. It's essentially a not-too-sweet yeasted bread rolled around a filling made from nuts, jelly-roll style. It is an all-day affair, the sort of thing I imagine hearty women from yesteryear toiling over while gossiping by a warm hearth. A little boy runs up to the floured workspace for a taste. He gets a slap on the hand and is ordered to go play outside and leave the women be. This is exactly the kind of fantasy that makes me want to try making it by hand, without a mixer. It would be exhausting, but what a lovely connection it would forge through the generations!
What's that, you say? Potica is an Eastern European pastry. It's essentially a not-too-sweet yeasted bread rolled around a filling made from nuts, jelly-roll style. It is an all-day affair, the sort of thing I imagine hearty women from yesteryear toiling over while gossiping by a warm hearth. A little boy runs up to the floured workspace for a taste. He gets a slap on the hand and is ordered to go play outside and leave the women be. This is exactly the kind of fantasy that makes me want to try making it by hand, without a mixer. It would be exhausting, but what a lovely connection it would forge through the generations!
We make it because my family hails from Slovenia, though I suppose it's more accurate to say we are from that area rather than the particular country because the region has seen some changes since my ancestors lived there. My grandfather was in the first batch of us to be born in the US, which makes me the third generation. Neat, right? In truth, the only literal connection I have to these Exotic Roots is the potica and perhaps my nose or generous eyebrows.
The paternal side of my family has been making potica ("puh-teet-zah") for as long as I can remember. First, in my memory, anyway, it was my grandparents who would mail us long, lovely loaves of the finished concoction. We would eat slices of it for breakfast just before, during, and after Christmas. As my grandparents got older, other members of the family stepped up, and in my teenage years my branch of the family started our attempts.
We improvise and adjust every time, but here's the recipe we always start with:
makes four long (12-14"?) loaves; we often will make the loaves smaller to get a larger yield
FOR THE BREAD
- 2 pkgs yeast
- 1/2 cup warm water
- 2 cups milk, more fat is better
- 3/4 cup sugar
- salt to taste
- 3/4 cup soft butter
- 6 egg yolks
- 8-9 cups of flour
FOR THE FILLING
- 1 1/2lb shelled, toasted, finely ground nuts. We do 50-50 pecans and walnuts. Grind them until they're essentially a nut flour and starting to gum up into a nut butter
- 1 1/2 cups heavy cream
- 2 cups sugar (less is fine too)
- 1 1/2 tsp vanilla
- 1/2 cup graham cracker crumbs
- 6 egg whites
We start with the dough. The yeast gets sprinkled over the warm water with an undocumented tablespoon (-ish) of sugar to help activate it. This is the proper way to get yeast a-moving. When I made this with my parents last month, we had a miscommunication and did it totally wrong. (I should note it had also been at least three years since we all made it together.) Here's how not to do it:
 |
| We dumped the yeast onto all of the warmed milk |
 |
| it clumps horribly! |

Save yourself some trouble and just dissolve the yeast with a little sugar in some warm water, let it bubble, then add to the rest of the non-flour ingredients: milk, egg yolks, sugar, butter, pinch salt.
 |
| everything but the flour |
 |
| It's sensually pleasing and, you know what, you're less likely to snag a yolk this way |
 |
| Pass the yolk back and forth between shell halves, letting the whites drip into a bowl below. |
 |
| golden beauties |

 |
| Scrape down those sides! |

You're getting close. What you're looking for, ultimately, is for the dough to pull away completely from the sides and leaving a clean bowl. Like so:
 |
| No visible flour on the dough. Fully incorporated! |


While the dough rises, we make the filling. A few days prior, I purchased some massive bags of pecans and walnuts from the company I work for. Ultimately it was way too many nuts (TEN POUNDS TOTAL) but I was able to get them at cost, which is a much, much better deal than I would have gotten buying a bunch from the grocery store. Nuts keep indefinitely in the freezer, right? RIGHT?

Anyway I used a kitchen scale to keep everything accurate and I measured out 1.5lbs each of walnuts and pecans. (This is for a double batch.)


I toasted the nuts in a pan.


 |
| pecans came pre-chopped, which I didn't expect |

And then I used my company's Robot Coupe to grind the nuts…


It had been a few years since I was involved with making potica, and my dad was always in charge of grinding the nuts… this detail is important because I mistakenly kept the nuts a little coarse! What I should have done is ground them to a fine powder, almost to the level of nut butter. The larger pearls of nuts you can see in the above picture added a nice crunch to the finished product, but I would say, overall, that they were Too Big and that you can make a Better Potica with More Finely Ground Nuts.
Anyway I start the filling by melting some butter in a pan and then adding graham cracker crumbs. These two get toasted together.


And at the same time I gently, gently heat up some cream in a large pot. I add sugar to the cream and stir to dissolve. Keep warm. This is also when you might consider whipping up those egg whites that you set aside earlier…


And once the cream is warm, it's time to add some vanilla, a pinch of salt, the nuts, and the graham cracker crumbs. Oh, and dates! I forgot to discuss the dates. This is an addition that is specific to my branch of the family. Someone (Dad?) thought to include ground dates to add some moisture to the filling. Dates are sweet, sticky, and rich. Just the ingredient for the job! So, this is not precise at all, but… basically I bought a bag of dates and cut them as small as I could. Then I added them to the nuts and cream.
 |
| They came pre chopped, but... |
 |
| this is better. |

 |
| Dates, nuts, crumbs |
Mix well, then fold in those egg whites.


Can you tell that the filling is a little thin? That there's larger pea-sized pieces of nut, and that the cream/egg whites are kinda liquid-y? This is because I didn't grind the nuts finely enough. In the past, when Dad does the grinding, the filling is a more like a loose paste. My filling, rather, was comparable to… chestnut soup? Not quite that severe, but you get what I'm saying. I wonder how the final result will turn out???
By this time you should check the dough, see how it's doing, and if it looks like this:
 |
| downright supple |
Divide the dough into four pieces…


And set aside three of the four for later use. Cover them with a damp towel so they don't dry out.
Roll it out…

Try to make it rectangular, try to make it thin, try to make it even.


Then we add some filling…


See the thin liquid/nutty pebbles thing I was referring to earlier? This was indeed unusual and I was more than a little nervous about how this would affect the final product. Onward!

We choose the longest side and roll roll roll. Keep it tight.

And then we divide into smaller pieces… length normally determined based on the size pan we'll be using for baking.


Try to seal the ends as best you can…
 |
| Pretty is not always Possible |

 |
| Why yes, the ends did come totally unsealed |
And then we bake! 350° for half an hour or so. Don't crowd the oven. Rotate the pans halfway through. Keep a blasted eye on these precious treasures!


We made a double batch, which meant while we were rolling out the first round of dough (divided into quarters, remember? So four roll-outs, 3-4 rolls per quarter…), a second round was waiting in the wings. I was concerned about over proofing…

But alas nothing terrible happened so I guess it's okay to let the dough rise for as long as three hours (!) when the recipe recommendation is just one.
So how did it turn out??
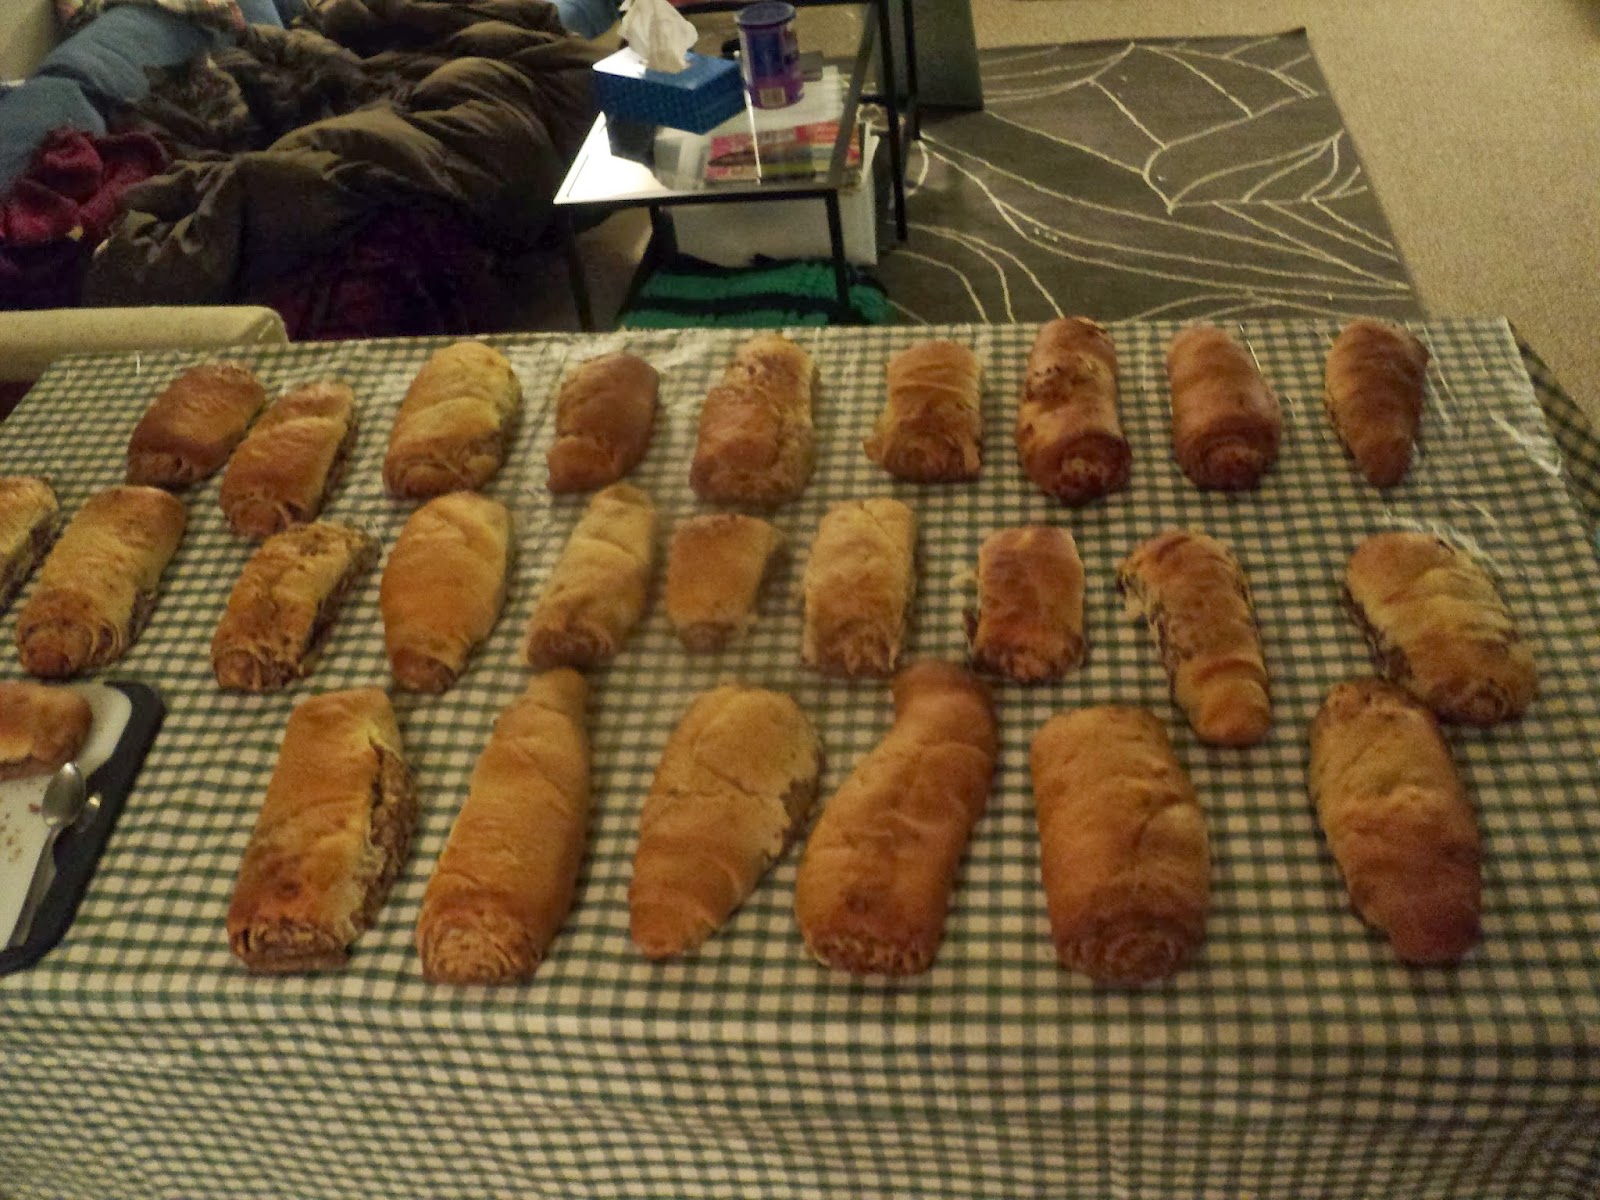

See how the filling sort of piled up along the sides, rather than creating a beautiful even spiral throughout? See how bready it looks? These are all what I'd consider Less Than Perfect characteristics. I'm not sure why the dough rose so much once it was in the oven. Maybe we didn't roll it out thinly enough? Maybe the yeast was "too strong"? Maybe we let it proof for too long? The filling issue happened because, as discussed, I didn't grind the nuts enough and so they were like little pebbles in the filling rather than a fine flour which would have given more structure.
Still, it's darn delicious.

And if nothing else, I'm inspired to try again and attempt perfection. Second time's the charm?
You did a great job, Captain! Thanks for documenting the process;it's quite involved, eh? A word of advice, use a substantial pin roller. One that is 2.5-3" in diameter. It is necessary so that you can put enough pressure on the roller to make the dough very thin. My Dad used to say that the dough should be thin enough that you could read the paper through it. I don't advise trying, though. All-in-all, you did a wonderful job, L & the time spent was very special. From a true admirer, Dad.
ReplyDeleteAmazing coverage of the big event of making potica! It's great having that documentary.Inredible how many photos it took to tell the story. Love your descriptions too--like "sunny fat" "golden beauties".
ReplyDeleteReally appreciate your doing this, daughter!
Thank-you for sending us a potica. We took it with us to Savannah and it was enjoyed by all. I thought it was perfect - no need to change a thing. My college roommate's mother in Ohio used to make it and we would get some occasionally. Yours was much better. Keep on writing!
ReplyDeleteThese photos made me SO hungry!!! .... I wonder if I have any potica left in my freezer.....
ReplyDeleteWe also received a "surprise" package of potica in the mail, just in time for Christmas. It was very much enjoyed by our family. A great BIG thank you for thinking of us. Loved your blog!
ReplyDelete